Mark your segments
Use duration markers, or paired point markers, to define every segment IN and OUT.

The world’s only timeline-to-broadcast-slate tool
Segment TC turns timeline markers into a clean 1920×1080 broadcast slate with accurate IN, OUT and TRT values—ready in seconds.
MARKERS IN
SLATE OUT00:00:02The broadcast slate tool editors were missing
Editors lose time copying timecodes, calculating durations and checking formatting. Segment TC reads the markers you already placed and builds the slate for you.
Three steps. One clean handoff.
Use duration markers, or paired point markers, to define every segment IN and OUT.
Add the title, episode and media ID. Segment TC calculates every TRT and the total duration.
Receive a full-HD PNG that is consistent, readable and ready for the delivery package.
What comes out
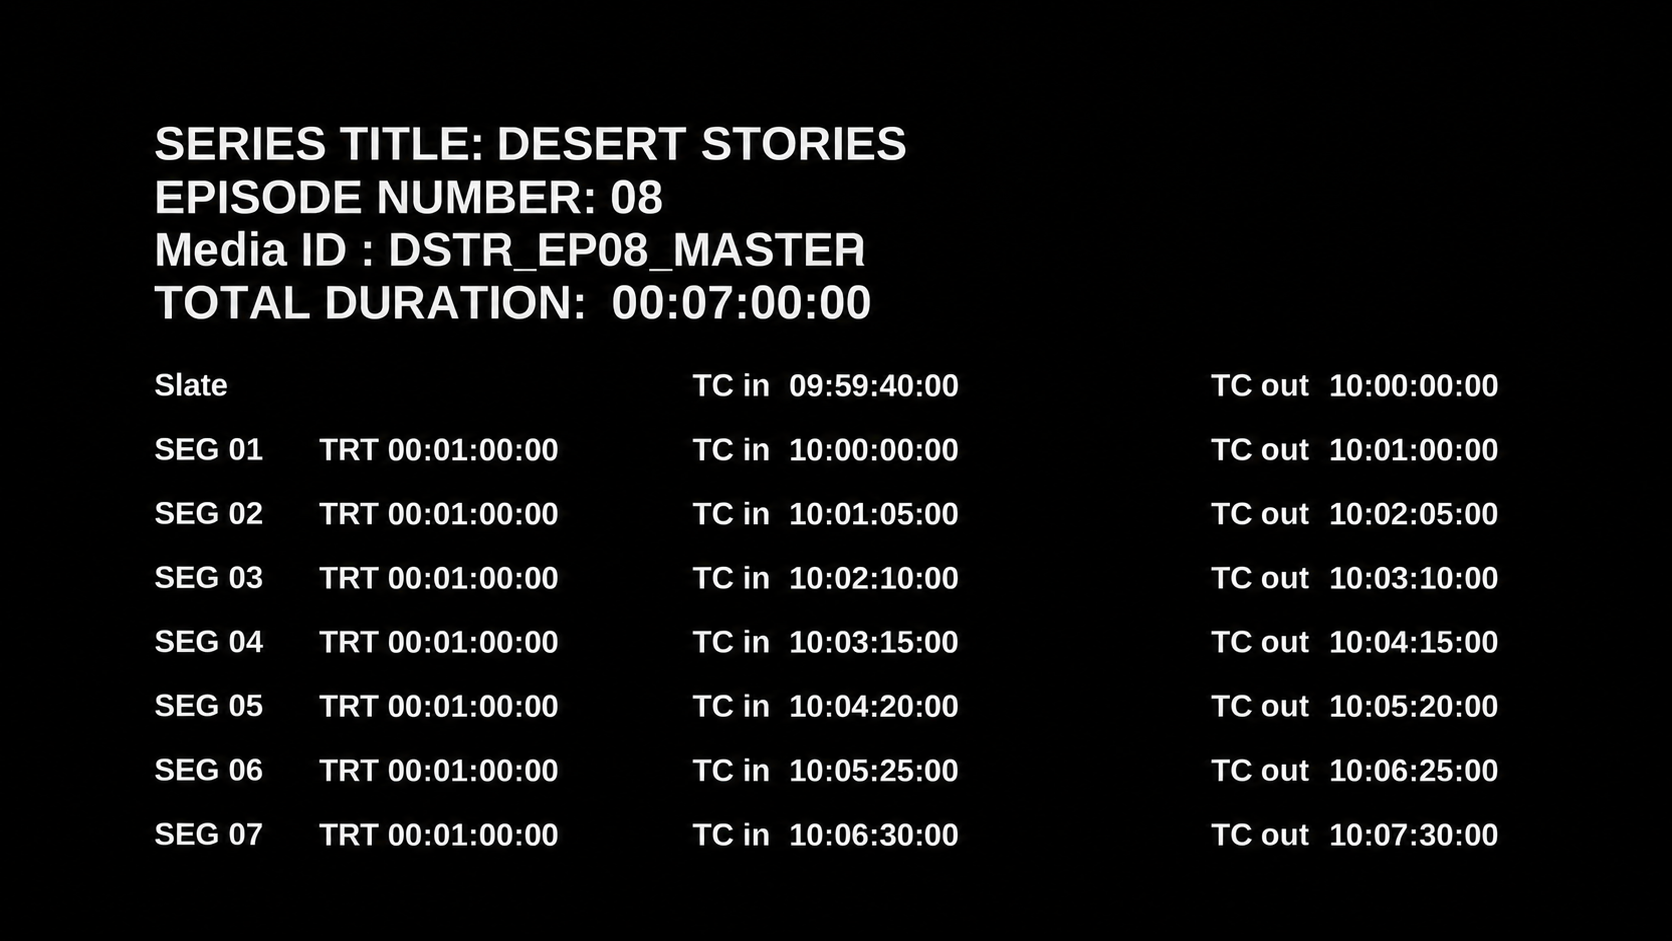
The finished 1920×1080 slate contains the show details, total duration and segment-by-segment IN, OUT and TRT values.
Choose your edit bay
A native panel that works alongside your timeline and creates the finished slate without leaving Premiere.
 WINDOWS + MAC-OS
A Utility script that generates the same slate and imports the PNG directly into the current Media Pool.
Supported integer frame rates: 24, 25, 30, 50 and 60 fps. Drop-frame and fractional frame rates are not currently supported.
Installation guide
Your download contains both editions. Follow the guide for your edit system, then restart the host application before opening Segment TC.
Windows + MAC-OS
Requires Premiere Pro 25.6 or later and the Adobe Creative Cloud desktop app.
Open the Segment TC package and locate Premiere Pro - Windows/SegmentTC_Premiere_v0.5.8.ccx.
Double-click the .ccx file. Creative Cloud Desktop opens automatically. Choose Install when Adobe shows the third-party plugin notice.
Restart Premiere Pro, then choose Window → UXP Plugins → Segment TC. Dock the panel wherever it fits your workspace.
Open a sequence, add duration markers or paired IN/OUT point markers, enter the title, episode and media ID, then click Generate Segment Slate.
If the installer does not open, launch Creative Cloud Desktop first and double-click the CCX again. Make sure Premiere Pro 25.6 or later has been opened at least once. If the panel is missing after installation, restart Premiere and check Window → UXP Plugins.
Windows + MAC-OS
The Resolve edition is a Python Utility script. Install Python with Tkinter and Pillow before copying the script.
Install Python 3 from python.org ↗. On Windows, enable Add Python to PATH in the installer. The python.org MAC-OS installer includes Tkinter.
py -m pip install --upgrade Pillowpython3 -m pip install --upgrade PillowPillow installation reference: official Pillow documentation ↗
Run the command for your system. A small Tk window should open and the terminal should print Segment TC ready.
py -c "import tkinter; from PIL import Image; print('Segment TC ready')"python3 -c "import tkinter; from PIL import Image; print('Segment TC ready')"From the downloaded package, copy SegmentTC_Resolve.py into the Utility folder for your operating system. Create the final folders if they do not exist.
C:\ProgramData\Blackmagic Design\DaVinci Resolve\Fusion\Scripts\Utility\%APPDATA%\Blackmagic Design\DaVinci Resolve\Support\Fusion\Scripts\Utility\/Library/Application Support/Blackmagic Design/DaVinci Resolve/Fusion/Scripts/Utility/~/Library/Application Support/Blackmagic Design/DaVinci Resolve/Fusion/Scripts/Utility/MAC-OS tip: In Finder choose Go → Go to Folder…, paste the path, then press Return.
Restart DaVinci Resolve Studio. Open a project and timeline, then choose Workspace → Scripts → Utility → SegmentTC_Resolve.
Use timeline markers, not clip markers. Enter the series title, episode number and media ID, then click Generate PNG + Import to Media Pool and choose where to save the PNG.
Script is not listed: confirm the filename is SegmentTC_Resolve.py, confirm it is inside the final Utility folder, then fully restart Resolve.
Pillow is missing: repeat the install command using the Python installation that Resolve can access.
Tkinter is missing: reinstall Python from python.org with Tcl/Tk support, then repeat the verification command.
No markers found: move the markers to the timeline ruler. Markers attached to individual clips are not read.
Built for real delivery work
IN, OUT, TRT and total duration are calculated from your timeline data.
Every export follows the same clean full-HD slate layout.
Segment TC reads markers and creates a file. It does not edit, move or place clips.
If you can place markers, you already know almost the entire workflow.
Choose your Segment TC license
Both plans include the Premiere Pro and DaVinci Resolve Studio editions, installation guides and direct email support.
Questions, answered
No. It reads timeline markers and generates a separate PNG. It does not move clips or place anything on the timeline.
Duration markers can define complete ranges. Single-frame point markers can also be paired chronologically as IN and OUT points.
DaVinci Resolve Studio, Python 3 with Tkinter, and Pillow in the Python environment used by Resolve. The included guide walks through installation.
Not in the current release. Segment TC currently supports 24, 25, 30, 50 and 60 integer frame rates.
Yes. Both the Premiere Pro and DaVinci Resolve Studio editions work on Windows and MAC-OS.
The annual license renews at $129 per year and includes updates while active. The $299 lifetime license is a one-time payment for permanent use of the purchased version.